Normalizing Sprite Frame Sizes So Your Engine Imports Animations Cleanly
If you have ever imported an animation and watched your character vibrate, slide a few pixels left on one frame, or sink into the floor on another, the problem almost certainly is not your animation code. It is the frames. They are different sizes, trimmed differently, or anchored to whatever bounding box the renderer happened to spit out. The engine is doing exactly what you told it: centering each ragged frame on its own canvas, then playing them back to back.
The fix is boring and it works every time. Put every frame on one identical square canvas, anchor it the same way, and let the engine treat the whole thing as a uniform grid. That is what frame normalization means, and it is the difference between an animation that reads as a single moving object and one that looks like it was cut out of a magazine by someone in a hurry.
Why frames drift in the first place
Most sprite work today comes out of a pipeline that does not care about your engine. AI video gives you a sequence of stills at whatever resolution the model felt like. A 3D-to-2D render bakes each pose into a tight bounding box. Even hand-drawn sheets pulled from different sources end up with mismatched padding. The art is fine. The geometry is the problem.
When you trim transparent pixels off each frame independently, a frame where the character raises an arm becomes wider than a frame where the arms are down. Drop both onto the engine's default center anchor and the body shifts horizontally between them. That horizontal jitter is the single most common animation bug I see, and people spend hours nudging keyframes when the real fix is upstream.
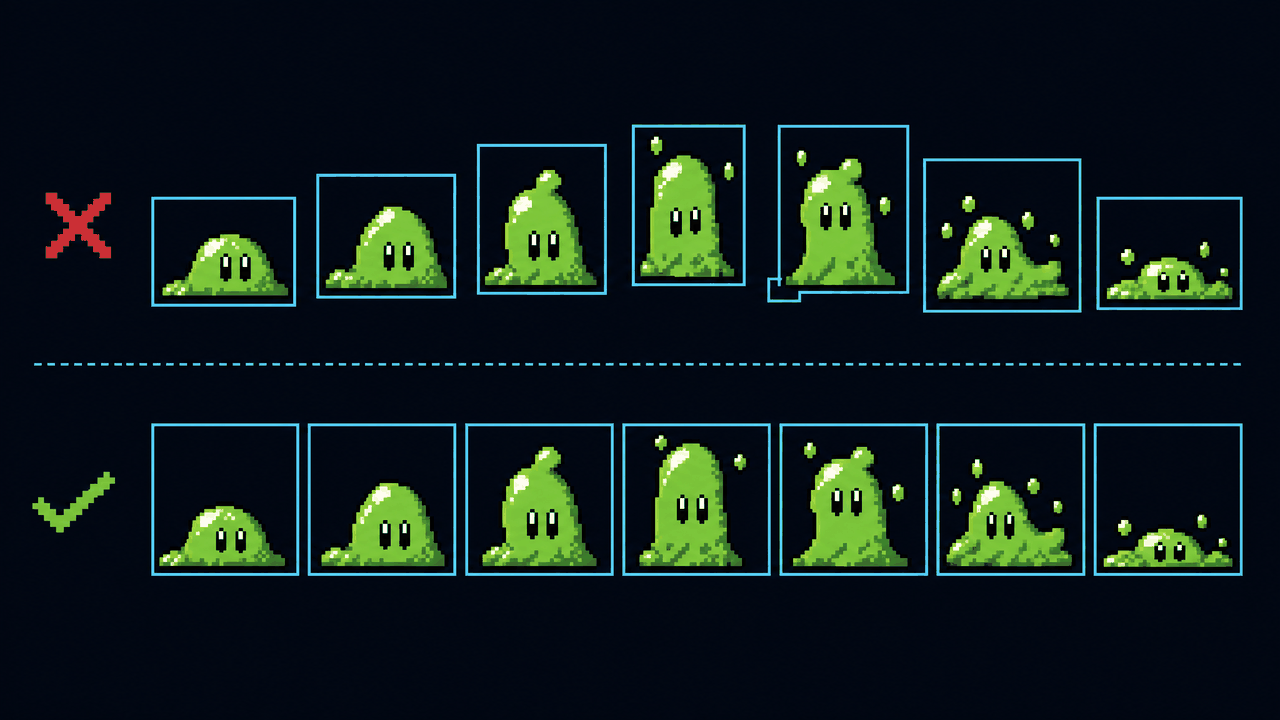
So the rule is: trim if you want, but after trimming, every frame goes back onto a shared canvas of one fixed size, with a consistent anchor. Trim to find the real content, normalize to make it playable.
Pick one square canvas for the whole animation
Square, not just consistent. You can technically normalize to a fixed non-square rectangle and it will play fine, but square frames save you grief later: they rotate cleanly around a center, they flip without surprises, and they pack into atlases without you tracking two dimensions per cell. Pick a size that fits your tallest, widest frame with a little breathing room and use it for every frame in that animation set.
To find the right size, trim each frame to its actual content first, then measure the largest result. If your biggest trimmed frame is 58 by 74 pixels, do not normalize to 74. Round up and give yourself margin. This is where Sprite Slicer does the tedious part: it auto-trims the transparent padding off each cut, then normalizes every frame to a fixed square you choose, aligned either to the bottom or to the original source position. Bottom alignment is the one you want for anything that stands on the ground.
Bottom alignment versus center
For a walking, running, or idling character, align frames to the bottom center of the canvas, not the geometric center. The feet are the contact point with the world. If you center each frame, a tall jump pose and a crouch pose will place the feet at different heights, and your character bobs up and down against the floor. Bottom-align and the feet stay put while the rest of the body moves above them, which is exactly how it should look. Save center alignment for things that float: projectiles, spinning pickups, explosions.
Power-of-two sizes and why they still matter
The old hard requirement that textures be power-of-two (16, 32, 64, 128, 256, 512, 1024) is mostly gone on modern hardware. Non-power-of-two textures import fine in every engine here. But the habit is still worth keeping for two reasons.
First, GPU memory. When an engine builds a texture atlas or compresses a texture, power-of-two dimensions compress more predictably and waste less padding. A 100x100 frame often gets quietly stored as if it were 128x128 anyway. You paid for the 128 either way, so you might as well use it.
Second, clean math. A 64-pixel frame at 64 pixels-per-unit is exactly one world unit. A 100-pixel frame at 100 PPU is also one unit, sure, but the moment you start scaling, tiling, or snapping to a grid, powers of two divide and halve without producing fractional pixels. Pick 32, 48, 64, 96, or 128 for character frames in most 2D projects. 48 and 96 are not powers of two but they divide cleanly and are common in pixel-art games. Avoid weird numbers like 67 or 113 for no reason.
Padding, insets, and bleeding
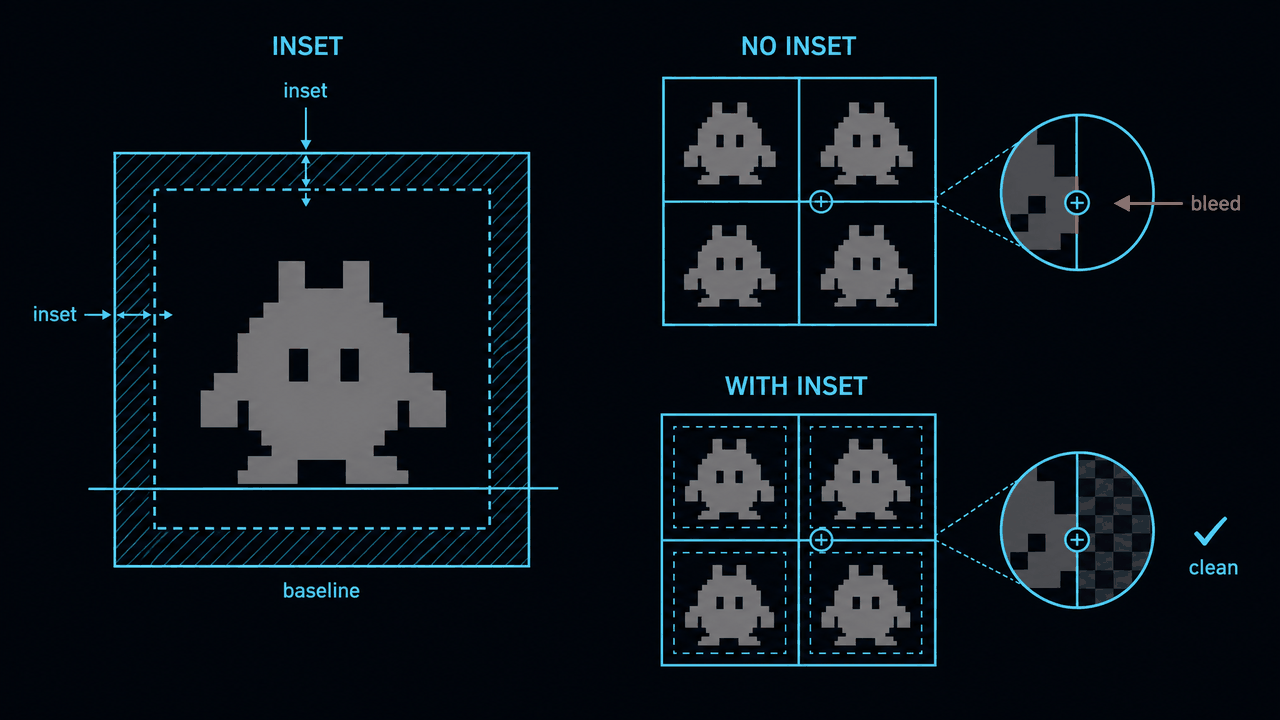
Leave a transparent gutter inside each normalized frame. One or two pixels of empty space on every side, an inset, keeps your art off the very edge of the canvas. This matters because of texture bleeding: when frames are packed into an atlas and sampled with any filtering or at non-integer scale, the engine can pull in a sliver of the neighboring frame. A small inset gives the sampler clean transparent pixels to grab instead of your previous frame's elbow.
If you are exporting individual frames rather than a packed sheet, the inset still helps for filtered scaling, but the bigger payoff comes when your engine repacks them into a runtime atlas, which most do. Two pixels is plenty for pixel art. For high-resolution art you might go four. Do not go overboard; padding is wasted texture space, and on a 32x32 frame, four pixels of border on each side leaves you a 24x24 drawing area.
Importing into Unity
You have two paths, and the choice matters.
- Sliced sheet: import one normalized sheet, set
Sprite Modeto Multiple, open the Sprite Editor, and slice by grid using your fixed cell size (Grid By Cell Size, 64x64 if that is your canvas). Because every frame is the same size on a uniform grid, the slicer lands on every frame with zero manual nudging. This keeps your project tidy: one asset, one texture. - Individual frames: import each frame as its own sprite. More files to manage, but dead simple, and Unity packs them into an atlas at build time anyway.
Set Pixels Per Unit to match your frame size if you want one frame to equal one world unit, or to your project's standard (commonly 16 or 100). Keep it the same across every sprite in the game or things will not line up. For pixel art, set Filter Mode to Point (no filter) and Compression to None, otherwise Unity blurs your crisp pixels into mush. Set the pivot to Bottom for grounded characters so it matches the bottom alignment you baked in. Drag the sliced frames into the scene to auto-generate an Animation clip, or build it yourself in the Animation window.
Importing into Godot
Godot 4 has the nicest workflow of the three for this. Use a Sprite2D or AnimatedSprite2D and assign a SpriteFrames resource. The SpriteFrames editor lets you load a sheet and define a grid by frame count or cell size; with normalized frames this is one step. Alternatively load individual frames directly into the animation list.
The setting that bites people: texture filtering. In Project Settings, under Rendering > Textures, set the default texture filter to Nearest for pixel art, or set it per-texture in the import dock. Leave it on the linear default and your pixels go soft. There is no pixels-per-unit concept like Unity; Godot works in pixels directly, so a 64-pixel frame is 64 pixels on screen unless you scale the node. If you want world-unit consistency, decide on a scale convention and stick to it across scenes.
Importing into GameMaker
GameMaker is built around exactly this model, which is why normalized frames feel native here. A sprite is a stack of equal-size subimages. Import a strip or sheet and GameMaker reads it as frames as long as the cell size is uniform, which yours now is. Individual frames import as added subimages.
Set the sprite's origin to Bottom Center for grounded characters, matching your bottom alignment. Under the sprite's texture settings, disable Interpolate Colors Between Pixels for pixel art (that is GameMaker's name for bilinear filtering) so frames stay sharp. Frame timing is set per object or via the sprite's playback speed, not baked into the import, so you control animation speed in code or the sprite editor.
The short version
Trim each frame to its real content, then drop every frame back onto one fixed square canvas with a consistent bottom anchor and a couple of pixels of inset. Favor sizes that divide cleanly. Import as a grid-sliced sheet when you want fewer assets, as individual frames when you want simplicity, and turn off filtering for pixel art in whichever engine you use. Do that and the animation imports in one pass with no jitter, no sinking feet, and no late nights nudging keyframes that were never the problem.
FAQ
Q. Do my sprite frames really have to be square?
They have to be a consistent size, and square is the version of consistent that causes the fewest headaches. Square frames rotate around their center, flip without surprises, and pack into atlases while you track only one dimension. A fixed non-square rectangle also plays fine, so if your art is strongly horizontal or vertical you can use that. Just keep it identical for every frame in the set.
Q. Are power-of-two frame sizes still required?
No. Every modern engine imports non-power-of-two textures without complaint. Power-of-two sizes (32, 64, 128) still compress more predictably in atlases and divide cleanly when you scale or snap to a grid, so they are a good default. Sizes like 48 and 96 are not powers of two but divide nicely and are common in pixel art, which is fine too.
Q. Why does my character jitter or sink into the floor between frames?
Almost always because frames were trimmed to different sizes and the engine centers each one on its own canvas, so the body shifts between frames. Normalize every frame to one fixed square and bottom-align it so the feet stay at a constant height. Set the pivot or origin to Bottom in your engine to match, and the jitter disappears.
Q. Should I import a sliced sheet or individual frames?
A sliced sheet keeps your project tidy with one asset and one texture, and because normalized frames sit on a uniform grid, the slicer lands on every frame with no manual adjustment. Individual frames are simpler to reason about and most engines repack them into a runtime atlas anyway. Both work. Pick the sheet for fewer files, individual frames for less setup fuss.
Q. What import settings keep pixel art from looking blurry?
Turn off texture filtering. In Unity set Filter Mode to Point and Compression to None. In Godot set the texture filter to Nearest, either project-wide or per-texture. In GameMaker disable Interpolate Colors Between Pixels. Also leave a one or two pixel transparent inset inside each frame so atlas sampling does not bleed in a neighbor frame's edge.